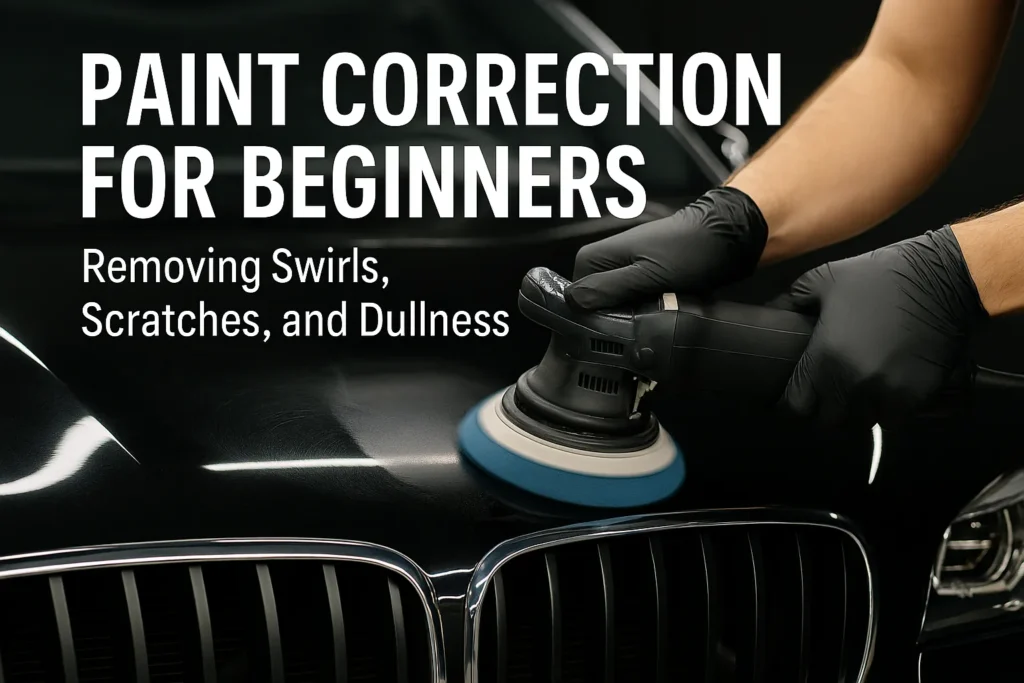
If you’re noticing dull paint, swirl marks, or fine scratches on your car’s surface, you’re not alone. Paint correction for beginners can seem intimidating, but it’s actually a straightforward process that can dramatically improve your vehicle’s appearance. In this guide, we’ll walk you through everything you need to know—from removing surface imperfections to restoring that deep, glossy shine.
Whether you’re a weekend car enthusiast or trying this for the first time, this article is your go-to resource for safe, effective, and satisfying paint correction.
What Is Paint Correction?
Paint correction is the process of removing imperfections in a vehicle’s clear coat to restore a deep, reflective finish. These imperfections can include:
- Swirl marks
- Light scratches
- Water spots
- Oxidation and dullness
- Holograms from improper polishing
Unlike waxing or using glazes, paint correction permanently removes defects rather than masking them. This is typically achieved using machine polishing with compounds and pads designed for cutting into the clear coat.
✅ Quick Tip: Paint correction doesn’t add paint—it carefully removes microscopic layers of clear coat to level out imperfections.
What Causes Paint Defects?
You might be surprised to learn how everyday habits can damage your paint over time. Some common causes include:
- Using dirty sponges or automatic car washes with harsh brushes
- Dry-wiping dust off your car
- Parking under trees (sap and bird droppings)
- UV exposure causing oxidation
- Poor previous polishing techniques
Even brand-new cars straight from the dealership can show signs of swirl marks due to rushed prep work.
The Paint Correction Process: Step-by-Step
While professional detailers may use high-end tools and multi-stage polishing systems, the core process remains the same—and can be adapted for home use.
1. Wash and Decontaminate
Before correcting paint, start with a thorough cleaning:
- Use a pH-neutral car shampoo to avoid stripping wax (like the Chemical Guys Mr. Pink Super Suds)
- Decontaminate with an iron remover and clay bar to remove embedded contaminants
⚠️ Avoid shortcuts: Any dirt left on the surface can cause new scratches during polishing.
2. Paint Inspection and Lighting
Use a LED inspection light or sunlight to assess paint defects. Look for:
- Fine swirls (circular spider-web patterns)
- RIDS (Random Isolated Deep Scratches)
- Water spot etching
- Oxidized or hazy areas
Make a plan: mild defects may only need light polish, while deeper ones may require a compound.
3. Test Spot
Always start with a test spot using a mild polish and soft pad. This helps determine the least aggressive combo that achieves results. It also prevents over-polishing.
🛠️ Recommended combo: Meguiar’s Ultimate Compound with a dual-action polisher and foam polishing pad.
4. Correction Stage
This is where the magic happens:
- Work in 2×2 foot sections
- Apply 3–4 pea-sized drops of product on your pad
- Spread the product at low speed, then polish at medium speed (4–5 on most DA polishers)
- Make overlapping passes (north-south, then east-west)
Wipe off the residue with a clean microfiber towel after each section.
Types of products used:
- Compounds: For heavy defects (e.g., 3D One Hybrid Compound & Polish)
- Polishes: For refining and gloss enhancement
5. Finishing Stage (Optional)
If the compound leaves behind haze or micro-marring, use a finishing polish and softer pad to refine the surface. This enhances clarity and boosts gloss.
6. Protect the Paint
Once corrected, the clear coat is vulnerable. Apply protection:
- Sealants or waxes for short-term protection
- Ceramic coatings for long-lasting defense (6–12 months or more)
Tools You’ll Need (Beginner-Friendly)
Here’s a basic checklist for safe and effective DIY paint correction:
- Dual-action polisher (avoid rotary polishers if you’re a beginner)
- Foam pads: cutting, polishing, finishing
- Paint compound and polish
- Microfiber towels (edgeless and soft)
- Car shampoo, clay bar, iron remover
- Panel wipe or isopropyl alcohol for inspection
🧰 Starter kit suggestion: Look for complete kits like the TorqX Polisher Kit by Chemical Guys—great for beginners.
Common Mistakes to Avoid
Even with good intentions, these mistakes can ruin your hard work:
- Over-polishing: Removing too much clear coat can lead to permanent damage.
- Wrong pad-product combo: Using an aggressive pad with a strong compound on soft paint may leave haze.
- Skipping test spots: Always test first.
- Poor lighting: You can’t correct what you can’t see.
- Dirty pads: Change or clean pads regularly to avoid reintroducing scratches.
How Long Does Paint Correction Last?
The results of a proper correction can last years, depending on how well you maintain your vehicle afterward. Regular hand washing using the two-bucket method, avoiding automatic car washes, and using paint protection will go a long way.
DIY vs Professional Paint Correction for Beginners
If you’re not comfortable with machines or your car has extremely soft or expensive paint (e.g., black Porsche or Lexus), hiring a professional might be a better option. But for most daily drivers, one-stage correction is very doable.
Expect to pay between $300–$1,000+ for professional correction depending on vehicle size and paint condition.
Summary: Bring Back That Showroom Shine
Paint correction is more than just cosmetic—it’s a transformative process that can bring dull, scratched, or faded paint back to life.
Key Takeaways:
- Swirl marks and dullness are correctable with proper tools and technique
- A dual-action polisher is safe for beginners
- Always start with the least aggressive method
- Protect your results with a good wax or ceramic coating
- Be patient—paint correction is a skill that improves with time
Final Tips for DIY Enthusiasts
- Work indoors or in shade to avoid heat and sunlight
- Invest in quality microfiber towels
- Keep your pads clean—pad cleaning tools or compressed air can help
- Don’t rush the process—paint correction is about precision, not speed
Ready to Start Your Paint Correction Journey?
This step-by-step approach to paint correction for beginners makes it easy to achieve professional-looking results at home.
With the right approach, even a total beginner can achieve professional-level results at home. Take it one step at a time, test often, and don’t be afraid to make mistakes—they’re how you learn.
👉 Start with a basic kit and practice on a small section of your car. You’ll be amazed at the difference just a few hours can make.
Your car deserves it—and so do you.
This page may contain affiliate links